October 23, 2016

[EMS] From Lionheart to Amaterasu!

Hi guys! I have been looking forward to this step in building my character a lot. Today my Amaterasu set outperforms my Lionheart set! In this blogpost, I'll explain (again) why I decided to do this change but also explain what I would lose and gain through this change. That does mean that this blogpost will be a long one to go through, though.

Most of you frequent readers know by now that I've been playing MapleStory Europe on my Hero for more than nine years by now. I've been trying to find a build that suits the needs not just for only my class, but also for myself. There are many ways to gain damage, and a lot of builds gives you plenty of everything and nothing, however, classes between themselves play very different from each other and every person plays the same class different too.

It's easy to just read a guide and take whatever everyone is recommending. While that might be good for starting this game or to remain casual, eventually when you play for a while it's probably better to find something that works for you instead. Knowing what you gain from your build is one thing, but what most people seem to forget is to consider what you won't get from your choices. Slots like Inner Ability, Skill Links, Character Cards and Hyper Skills/Stats aren't the only limited choices that will influence a lot, even to the fine details of what equipment you choose but also how you upgrade them would matter as much. You can all take the most fanciest guides out there, but in the end, if the pilot isn't suitable for his/her vehicle, don't expect too much in your performance on the field.

That said, my build centers around three things: my Ribgol Sword, having 120 base DEX and myself. I want something that is typically myself to pull off. I don't play games to compete against others, I play games to have fun. And when I have (genuine) fun in something, I tend to excel in competence and knowledge of the regarding subject.

This will be one of those rare blogpost on my blog where I would want to show you my equipment and thoughts behind it on a rather broad spectrum. I know that in my environment outside my blog, I have a lot of talk about my upgrades and stuff, even almost to a daily basis or so, but I'm aware that I rarely get to share this on my blog, so a lot of viewers who never really talk to me in-game would miss out on a thing or two. Without further ado, let's get to it.

October 14, 2016

[EMS] Self Combat Orders GET!


Hi guys! Definitely no big surprise, but I have obtained Self Combat Orders very recently!

It took less than 10 Meister Cubes to obtain it, and that is most likely to be average (on a good way) because the first line of Legendary will always wield a Legendary line. I was probably more lucky to also get another 9% STR on the third line, which is an interesting trade for my current shoes (my Lionheart Battle Boots has two lines of 6% All Stats).

Self Combat Orders (or Self CO for short) is a crucial part to my build on my Hero. Most readers know that I've obtained the Inner Ability line to increase passive skills by one level early in 2015 - Self CO increases all skills by one level - and increases most 4th Job skills beyond their initial maximum level (i.e. a Level 30 Skill becomes Level 31). Because the Inner Ability line also increases the same 4th Job skills beyond their Mastery Level (if they are allowed, that is), those passive skills that are affected becomes Level 32, and not just 31!

In case you wonder how tight one point of increase does to my build, I'll try to explain in a way that most Maplers can understand how much is affected by it. Hero works with a ridiculous amount of raw indirect damage - that is why Heroes tend to have low range, and the indirect damage compensates greatly for that. Self CO adds a lot of damage percentages to Raging Blow, Advanced Final Attack, Puncture, Shout (because Puncture passively boosts it as well) and Enrage - let's not forget that Enrage's boost works for all skills and that Maple Warrior gets an additional 1% All Stats boost, Advanced Final Attacks gains an additional 1 Attack and that I gain one additional percentage of Weapon Mastery. That in total already hefty increases my raw damage, but that's not all to it.

It's no secret that I work with a lot of critical damage, and Enrage and Puncture at Level 31 also impacts that with another 2% Minimum Critical Damage and another 1% Maximum Critical Damage - which in total gives me 104% Minimum Critical Damage and 108% Maximum Critical Damage under Puncture bleed and Enrage, instead of 103/106. The numbers might seem a bit off, but that is because my Minimum Critical Damage harshly exceeds my Maximum because I run four Adventure Rings simultaneously. The game adds all the Minimum Critical Damage into Maximum Critical Damage as long as your Minimum Critical Damage exceeds the Maximum. So, with all that Critical Damage improvement, on top of all of those hundreds of percentage of damage increase, that is significant.

The performance of my Hero is also improved given Combat Mastery becomes more efficient with giving 52% flat out Defence Ignore as a single value, Hero's Will goes from a 6 minute cooldown to a 5 minute one, and let's not forget that Puncture's higher Critical Damage boost for Party is also upped by one percentage in Minimum/Maximum Critical Damage. I also run a triple Bowman Card deck so Level 32 Advanced Final Attack would even get boosted further with another Final Attack damage boost from that Card deck. And well, that single point of Attack might also do its job well with my % Attack on my Ribgol...

All of this would also apply to 5th Job, because let's not forget that all 4th Job skills will apply with 5th Job. Most people seem to forget that you take all of your skills with you until the end of the game, given I only see most people just use the buffs and not a lot of the other useful skills.

My next step, as some of you frequent readers might now by know, is to try to cube Self Speed Infusion and Self Sharp Eyes on my Glove - this might take a while, but who knows! I find plenty of Meister Cubes, Chaos Cubics and purchase more cubes with my Reward Points, so the odds of obtaining it is certainly on the table. At least the moment when I also have my hands on Self SI in addition to the rest, it'll be time to replace my Lionheart and Alien Visitor set with my Amaterasu!

That's it for today - I'll see you guys again next post!

October 10, 2016

[Lego] Black light - Makuta (The Journey to One)

 
"Today I will take my rightful place among the gods."

Sup guys! It's time for the big bad of the Bionicle universe - whenever what alternate timeline or generation of the Bionicle franchise you're going to explore, Makuta is always there plotting his evil schemes. Well, except for one alternate timeline. But that aside - today we're going to look at the Makuta combiner model from Generation 2 Bionicle's final chapter "The Journey to One".

Makuta's combiner model is built from seven (!) Generation 2 Bionicle sets. The seven sets are the Lord of Skull Spiders (#70790), Mask Maker vs. Skull Grinder (#70795), Ikir - Creature of Fire (#71303),  Tahu - Uniter of Fire (#71308), Onua - Uniter of Earth (#71309), Umarak the Hunter (#71310) and Umarak the Destroyer (#71316). You'll also need one extra ball joint too. However, even if you have all of these sets, there are no official instructions for this model.

How come? The Makuta combiner model was not intended to be physically released at all (this is why he doesn't have a set number for instance). The original physical model was made for the 3D render to be used in The Journey to One. It was also shown during the Makuta Building Contest and the design seemed to be very well received by the community. Because this combiner model or the instructions for it were not planned to be released, LEGO® released an album of pictures from the original physical model so the fans could at least reverse engineer it. Keep in mind that the Mask of Ultimate Power on all of the official images and the Makuta Building Contest video is a 3D printed prototype, and LEGO® has no plans for mass producing it, so the mask I'm using on Makuta is his former mask (the Mask of Control) he wore before the Mask of Ultimate Power.

However, reverse engineering the images isn't as easy as it may sound. There are a few parts of the model that are relatively not shown as how they are built. And there are actually some continuity issues between several pictures as well (where some parts of the build have been changed or swapped out halfway through). If you would look around various videos and images from fans you'll see that there might be some variations between them - as long as we don't exactly know how the model has been built, your guess is as good as mine. Surprisingly, the combiner model doesn't even use half of the parts that are available from all seven sets.

However, I do know that I've made one mistake in the ankles by using a hybrid 3 axle/pin instead of a 3 regular axle, and this was due to the resolution of the screen I was using to build the model. A similar thing happened to the orientation of the Hordika connector (which is flipped) and using the wrong connector piece for mounting his staff in his hand (which should've been this one). Unfortunately I figured those out after I made the pictures, and you can imagine that I won't reshoot everything just to get a few building mistakes out of it. I'm pretty sure there are some other mistakes I made as well, and I feel very uncomfortable and unconfident about it to be honest. So bear with me, I did my best. As said above: your guess about how certain parts were assembled is as good as mine. I will remain on the lookout for more possible mistakes, I will correct them, but these images will remain like they are.
 

Back to the model itself, regardless of small nitpicks - the overall presence of Makuta will still remain there. There is a lot to like about it. It uses a significant amount of transparent neon orange from the seven sets, not all though.

Makuta has an interesting anatomy. Proportion wise, he has long arms and his main torso is rather large. His "belly" bulges forward, giving it a strong presence in its overall design. Makuta goes with the "(over)dramatic large torso" design, a play of proportions of the human body. It's something that occasionally occurs in designing characters (how they look), two other examples of character designs where this also is used is Gilgamesh from Final Fantasy and Hoopa Unbound from Pokémon.

By the way, having "lanky" arms isn't really a new thing in Bionicle designs - it's actually very common among both generations.

There's this infamous phrase "If you can scratch your knees without bending, you might be an Inika build" which is about the fact that a lot of Bionicle characters could reach their knees without bending their backs because the arms are usually that long in order to accommodate their tools / vehicles (i.e. Axalara T9). The "Inika build" is a common way how Bionicle figures are assembled between 2006 and 2009, a trend that started with the eponymous Toa Inika themselves.

I'm not sure if I'm the only one, but I kind of see a samurai-inspired theme going on with the entire torso assembly, probably because of the locations where plating occurs and where not. One thing that I absolutely find fantastic about the design is how well the upper torso comes together (using half a Shadow Trap, a Cinderella wheel, a CCBS ribcage and several default CCBS armour pieces surrounding the wheel) and I really like how the wheel piece just grabs your attention by using the concave side to bring depth.

Another thing that I really like about the model is how the legs are built. It makes great use of those Technic beams in trans neon orange! The shoulder armour might be huge, but it does work with the overall theme that the design is going for - and the way how they can move around just gives a nice feel when you adjust their orientation.

There is so much to like about Makuta, that I even often forget that he even has a gearbox to move both arms around just like any of the non-Uniter Toa! Talking about luxury, there aren't that many large models like these to have a feature like that at all.

Sidorak, is that you?
Being a cunning and evil character like Makuta does also mean he comes armed. He has his big staff weapon, which can rotate the large flame tips. His left arm has the obligatory retractable sword-guard, something we haven't really seen since Sidorak. Not only that, Makuta is also protected from nasty back-attacks, with having actual blades on his back to repel and punish those who attack from behind. And well, he has some significant claws, right?

However, after all that drooling of this fantastic combiner model, it's clear to understand why this set isn't really suitable to be released as a toy.

Makuta has a lot of parts which are connected through pins or ball joints but not fully held in place - this gives him a lot of possible and fine motion for the animated show, but it of course hinders the physical model. It's difficult to grab him without accidentally moving or rotating certain parts.

Because Makuta has such a dramatic (but definitely awesome) designed torso, he becomes top heavy. He only has one ball joint for each knee with only one friction connector, which makes him "weak knee'd" - a common issue with several (large) Bionicle/CCBS models where because of lack of friction in the knees, the model wants to topple because the knees cannot handle the weight.

So, as a display piece, this model is definitely one that many Bionicle fans would love to have. And probably a lot of diehard Bionicle fans will get one as well! But you can imagine that this model isn't as sturdy or as playable as you would have with the norm, so having a mass production of this model might not work out that well. How tall is this model, actually?

 
When placing Makuta next to General Grievous (#75112) and Toa Mata Nui (#8998), it's clear to see that Makuta stands about "Grievous tall", which is significant to be fair. Makuta certainly has a lot of bulk and mass, which both Grievous and Toa Mata Nui kind of lacks in a way. It's funny that Umarak the Combiner is actually taller than Makuta's combiner model from The Journey to One.

This is by no means the tallest Makuta set out there, given Ultimate Dume is the tallest Makuta *and* Bionicle set released so far. And if Ultimate Dume will ever be defeated as the tallest Bionicle set, is a question to be answered for another day.


All in all, Makuta Journey to One is one hell of a Bionicle (combiner) model. It does a lot of things right. It looks fantastic, it does the character justice, there's some interesting use of pieces for the building process not found in any other Bionicle sets to date and it has the cookie cutter features of all default Bionicle sets - the mask popping feature and the gearbox.

This "set" will be definitely one of my favorite Bionicle designs to date. It's no Nocturn, it's no Umarak, it's not like Lesovikk, Mazeka or the Axalara T9 - it doesn't have to be and it's not shy to be something else. Is this towering giant worthy of the beloved Warrior/Titan subtheme? It probably is. And this fellow takes his rightful place among my favorite Bionicle sets on my display shelf.

That's it for now - I'll see you guys again next post!

October 03, 2016

[Lego] Black light - Umarak the Combiner


"You cannot summon the elements! You have left your world of light. Here, there is only shadow - shadow I command!"
 
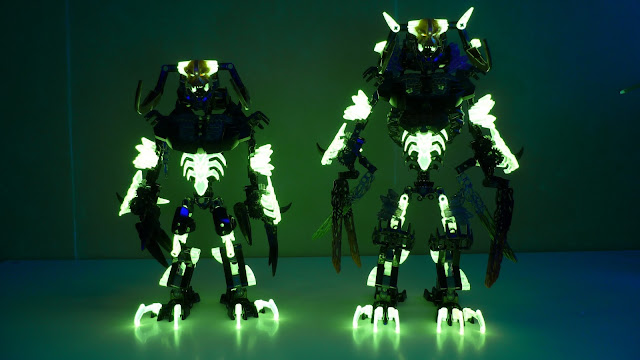
Hi guys! Today we'll cover the official combiner model for Umarak - unofficially called "Umarak the Combiner (Model)" - a build made out of Umarak the Destroyer and the three Elemental Beasts.
 
Umarak the Combiner's design is mainly inspired by his Destroyer model, and a lot of parts of that model has simply been expanded and stretched out. One of the very few pieces which are kept almost as similar as possible is the shoulder proportion, the face and the build of the arms.
 
Umarak the Destroyer on the left, next to the combiner model.

(Yes, I have accidentally let a green lightsaber piece photobomb the picture on the far right.
Next time I should move Grievous a bit more away from the camera view)
Man, this model is tall. Just look at how significant larger it is compared to Umarak the Destroyer! It is that massive, that they actually had to connect two large foot pieces for each feet to make his footprint large enough to create enough stability. Yes, this thing does stand stable for the rather thin leg build, and certainly does the "General Grievous" ankle build support the stability. Talking about General Grievous...

On the left, #75112 General Grievous and on the right, #8998 Toa Mata Nui,
Umarak the Combiner isn't just "tall". He stands taller than the infamous General Grievous set! Yes, Umarak isn't as tall as Toa Mata Nui, but that doesn't give Umarak the Combiner less credit for going absolutely out of proportions. Then again, Toa Mata Nui isn't the tallest Bionicle/CCBS build... Ultimate Dume still holds the record for being the tallest Bionicle/CCBS build - which shows again, if you want to be tallest build, you have to be an evil character for some reason.
 
And yeah, for the people who apparently paid attention to the LEGO® sets I own (or to some blogpost in 2015), I do have Ultimate Dume - but the reason why he isn't on any of these pictures is because the entire model has been disassembled and stored in my parts supply (ever since 2004) and it will take probably more than 20 painful hours to find all the pieces back because I'm such a terrible person with sorting pieces. Perhaps I might consider to build him again one day in an unknown distant future, but it is not on my mind at the very moment - but for now, hopefully Toa Mata Nui is a proper substitute for the following height comparisons for you all. At least if one model does not tower the yellow Great Spirit himself, it surely won't be taller than Dume!
 
Back on Umarak the Combiner though! Because the height comparison picture was taken in a fully lit room, you can see the obvious mix of different colours you wouldn't be able to see that well in the more darkened pictures on this post. Yes, I know that many people found this "awful" to look at, and in a way I can understand that opinion.
 
It is kinda difficult to build a cohesive combiner model when you have four models with four different colour templates and thus four limited inventories. For what they could've done, I think that the design is okay. One detail I definitely like about this model is how the Shadow Trap halves are used to extend the rib cage! Surprisingly, Umarak the Combiner has a lot of pieces left from the Elemental Beasts sets. There's enough pieces to create at least one model of your own, or to change/add pieces to the combiner. Speaking of which...
 
The arms are heavy and only supported by one single ball joint with a friction connector (similar to the Destroyer model), so it does have issues with posing his arms up occasionally. Also similar to the Destroyer, most poses should do just fine, it's just the ones where the arms would be stretched out horizontally or above his shoulder height. Thankfully, there is plenty of pieces left to use from the three other Elemental Beasts sets, which makes me wonder why they didn't use them to reinforce the arms. But if you want to reinforce the arms-to-shoulder connection, you should be able to come up with something because there's plenty of pieces to use.
 
The combiner model surprisingly still uses the waist articulated torso from most 2016 Bionicle sets. One may wonder how such a top heavy model would make use of the turntable because of its sheer mass. Actually, it is probably one of the best models to play with this feature - the extra weight the body pushes on the turntable makes it run smoothly without the squeaking sound it usually makes on most other sets. In addition, this model has such a length for its arms that it's easy to turn the waist and hit stuff because of the reach the arms give. Imagine if a towering beast with those arms and fingers comes at you and tries to slash you...
 
So all in all, Umarak the Combiner might be one large figure, but is definitely to most people not a display model.
As a toy though, this model doesn't do that much wrong at all. This model isn't perfect, but it is certainly not a bad product either - to me, it scores higher than average. Perhaps this model does a better job than Umarak the Destroyer as a toy - there's nothing wrong with that, right?
 
 
Last but definitely not least, here's a bonus! Because Umarak the Destroyer comes with a Transparent-Neon-Orange variant of the Umarak the Hunter mask, you can make a recolour of Umarak in Transparent Neon Orange. Man, he certainly looks different in orange. I still think I prefer his original Bright Green design, but his Neon Orange is still awesome in my opinion!
 
That's it for now - the next Black light post will be about the Makuta Journey to One model. I'll see you guys again next post!